
Before you can use Gift Vouchers you need to configure the default settings for each voucher.
Go to Setup > Global Options > Credit Notes/Gift Vouchers > Gift Vouchers
Gift Voucher options which can be configured are outlined as follows:
Gift Voucher Type – This can be used to specifically use different types of vouchers for different uses, to help you identify what type of voucher is more likely to be redeemed. Each voucher type can have a custom Expiry, Receipt Printer Logo and PDF Logo.
Expiry Days/Date – Each Gift Voucher Type can have its own Expiry Days or Expiry Date, enabling control over the length of time a voucher is valid.
Set this value to a numeric value (e.g. 90) if you want to have the voucher expire after a specific number of days in the future from the date it is sold. Entering an Expiry Date either in the format of dd/mm/yyyy or mm/dd/yyyy (depending on the format used in your region) into the Expiry Date field will result in that date being set as the Expiry Date for all future Gift Vouchers that are sold using that Gift Voucher Type. When an Expiry Date has been set for a Voucher Type, the Gift Voucher Type can be sold by the Clerk as long as the current date is before the Expiry Date. Once the current date is equal to or greater than the Expiry Date, it will no longer be possible to sell the Gift Voucher Type and a new Expiry Date will need to be manually entered into this screen. All Gift vouchers sold will expire at 23:59:59 on the Expiry Date displayed on the Gift Voucher. When setting the Expiry Days/Date, ensure that the value configured complies with the local laws for the jurisdiction in which you are trading. E.g. Click on one of the following links to view the requirements for Australia, New Zealand or Canada, or refer to the laws that govern the sale of Gift Vouchers in your area.
Receipt Printer Logo – You are able to use any logo that is stored in the Pictures folder ("C:\ProgramData\Idealpos Solutions\Idealpos\Pictures"). Logos will print in Black/White only. Different printers may display your logo different to what's expected. Default images have been included in the Pictures folder for your use.
PDF Logo – You are able to use any logo that is stored in the Pictures folder ("C:\ProgramData\Idealpos Solutions\Idealpos\Pictures"). Logos can be full colour, representation will depend on the device it is displayed on. Images should be 507x378px ratio for best display. Default images have been included in the Pictures folder for your use.
Message – This message will display on the printed voucher if setting the voucher to print through the receipt. This is where you can insert the voucher conditions, which are usually governed by law. Ensure you comply with your local laws and regulations when issuing gift vouchers.
Company Logo – You are able to use any image stored in the Pictures folder ("C:\ProgramData\Idealpos Solutions\Idealpos\Pictures"). This image cannot be any wider than 735 pixels and the height can be whatever you want. Keep in mind that whatever height is used might affect how many pages the PDF will be printed on.
Website – Enter your website URL here, which will enable the Company Logo to have a hyperlink.
Print Vouchers on Receipt Printer – Uses the default receipt printer for voucher printing.
Only Print Voucher if No Email Address – Select this option to print the voucher only if there is no email address added to the sale. If an email address has been added, there is no need to print a Gift Voucher. If you select this option, the option "Print Vouchers on Receipt Printer" must be selected.
Automatically create Gift Voucher codes – If you do not have a numbering system in place and you are not using Customer Codes, you can select this to always create a number. This number will be represented as a barcode at the bottom of the receipt.
Gift Vouchers can be redeemed at any Site – If you have multiple venues in differing locations, this option gives you the flexibility to offer redemption at any of your stores.
Gift Vouchers use Customer Code – If you use customer loyalty and add all your customers to your database, you can use the default customer code that is already applied to the customer.
Can Search Gift Vouchers by Name – Gives you the ability to quickly find the purchaser of the voucher for re-printing or extending the expiry (provided that a name was entered when the Gift Voucher was sold).
Voucher details shown on Receipts – This option will print the Gift Voucher Details at the bottom of the Sale Receipt. Voucher details include: Gift Voucher Code, Name and Remaining Value.
Inhibit ability to add value to existing Gift Vouchers - This option will disable the ability to add extra value to any Gift Vouchers which have already been issued.
Expire Gift Voucher after a Single Redemption - This option will expire Gift Vouchers after they have been used for a Single Redemption. This can be used to encourage customers to spend the entire value of their Gift Voucher. Any value that remains on the Gift Voucher after it has been redeemed will be forfeited and no longer available. Note that should any special circumstances arise, any Gift Vouchers which still contain any remaining value and have been expired after a single redemption can be edited by the Clerk and have the Expiry Date extended, allowing the customer to spend the remaining value of their Gift Voucher. In addition, adding value to an expired Gift Voucher will extend the expiry date and make it usable again.
Programmable Bar Codes
Enable this option and configure the Position and Length fields for the Amount/Type if you sell pre-printed Gift Vouchers which contain Programmable Barcodes.
Programmable Barcodes typically contain information about the Gift Voucher such as the Gift Voucher Type and Gift Voucher amount embedded in the barcode.
During the sale of a Gift Voucher with a Programmable Barcode, you will typically scan the Programmable Barcode printed on the Gift Voucher.
Idealpos will then automatically extract the Gift Voucher Type and Gift Voucher amount from the Barcode and automatically input these details into the GIFT VOUCHER screen.
In order for this to happen, some configuration will need to be completed.
You will need to refer to a pre-printed Gift Voucher and determine what each number in the programmable barcode represents, then configure the following settings:
Amount - This will be used to extract the value or amount that the Gift Voucher will contain from the Programmable Barcode.
In the Position field, enter the position on the Programmable Barcode where the voucher amount/value begins.
In the Length field, enter the length of numbers in the barcode that contain the voucher amount or value.
The value entered into the Position field will be used as the starting point and the entered length will be used to extract the amount from the barcode.
Type - This will be used to extract the Gift Voucher Type from the Programmable Barcode.
In the Position field, enter the position on the Programmable Barcode where the voucher type begins.
In the Length field, enter the length of numbers in the barcode that contain the Voucher Type.
The value entered into the Position field will be used as the starting point and the entered length will be used to extract the voucher type from the barcode.
An example of a Programmable Barcode and the settings that will need to be entered is displayed below.
Note that your pre-printed Gift Vouchers that contain Programmable Barcodes will very likely differ to the below example.
After you have configured these settings, we strongly recommend that you test selling a Gift Voucher to ensure that the correct Amount and Type is being read from the Programmable Barcodes on your Gift Vouchers.
Programmable Barcode settings:

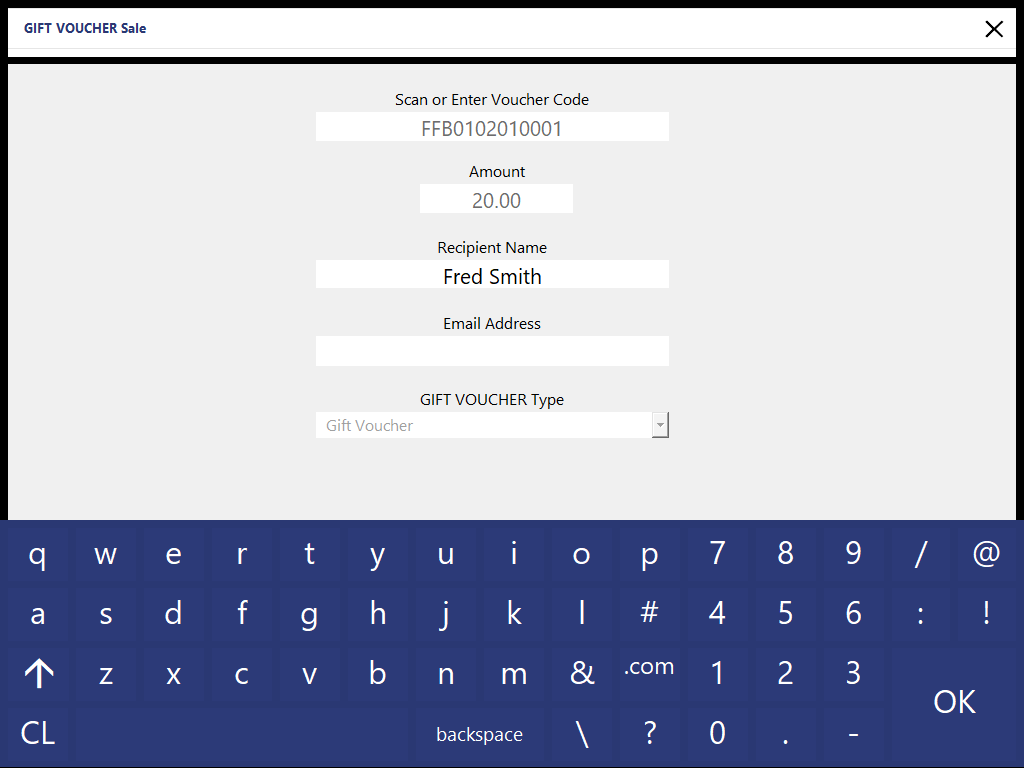
An example Gift Voucher showing Programmable Barcode:

Barcode: FFB0102010001
Amount: Extract amount from the barcode starting at position 6 using a length of 3. This will result in an amount of 020 being extracted ($20)
Type: Extract code from the barcode starting at position 4 using a length of 2. This will result in a Gift Voucher type of 01 being extracted.
Using the above as an example, the Amount and Type will be extracted and used when the Gift Voucher is sold.
From the Idealpos POS screen, press the GIFT VOUCHER button to sell a Gift Voucher.
Then scan one of your Gift Vouchers that contain a programmable barcode (such as the example shown above).
The fields will fill out automatically and the cursor will default to the Customer Name field.
You cannot edit any other field.
Enter the customer name and press OK.
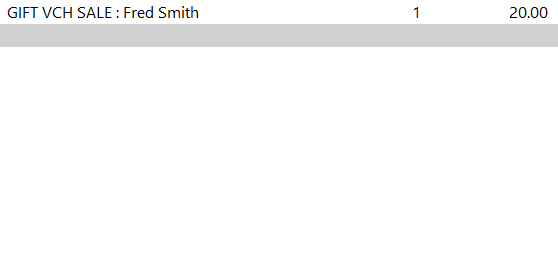
Finalise the sale as normal.
The voucher is now recorded through Idealpos and will be tracked.
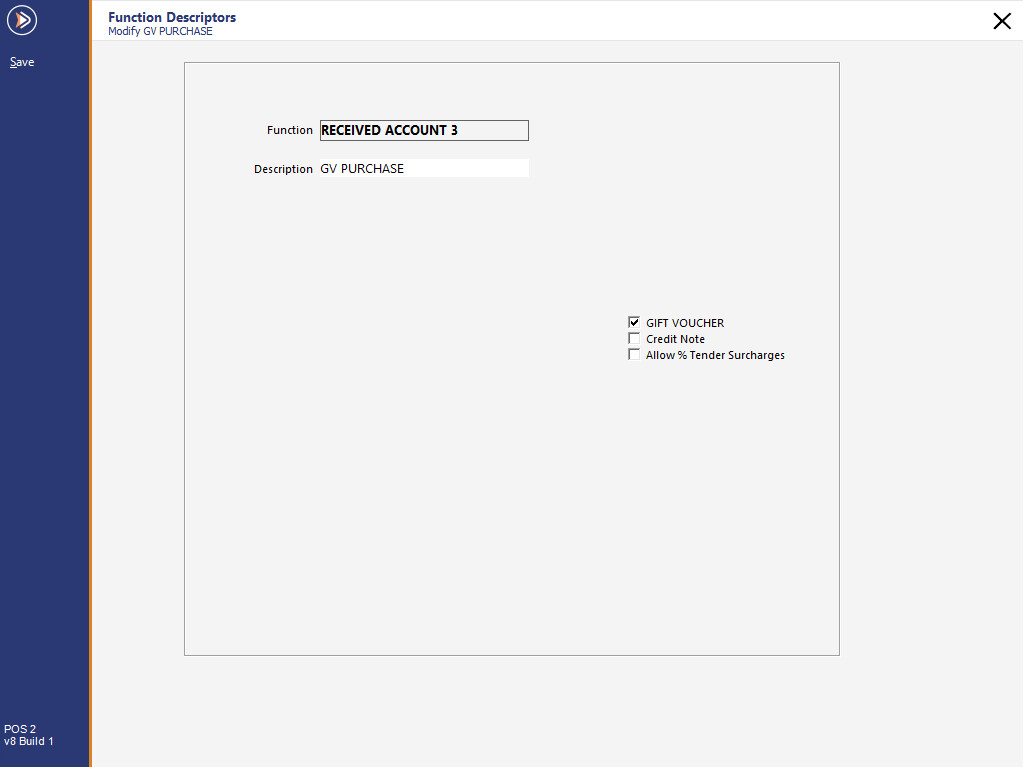
The sale of a Gift Voucher is recorded against an RA Function (Received Account).
To set this up go to Setup > Functions > Received Account – Select an appropriate function > Modify > Change Description > Tick Gift Voucher > Save.
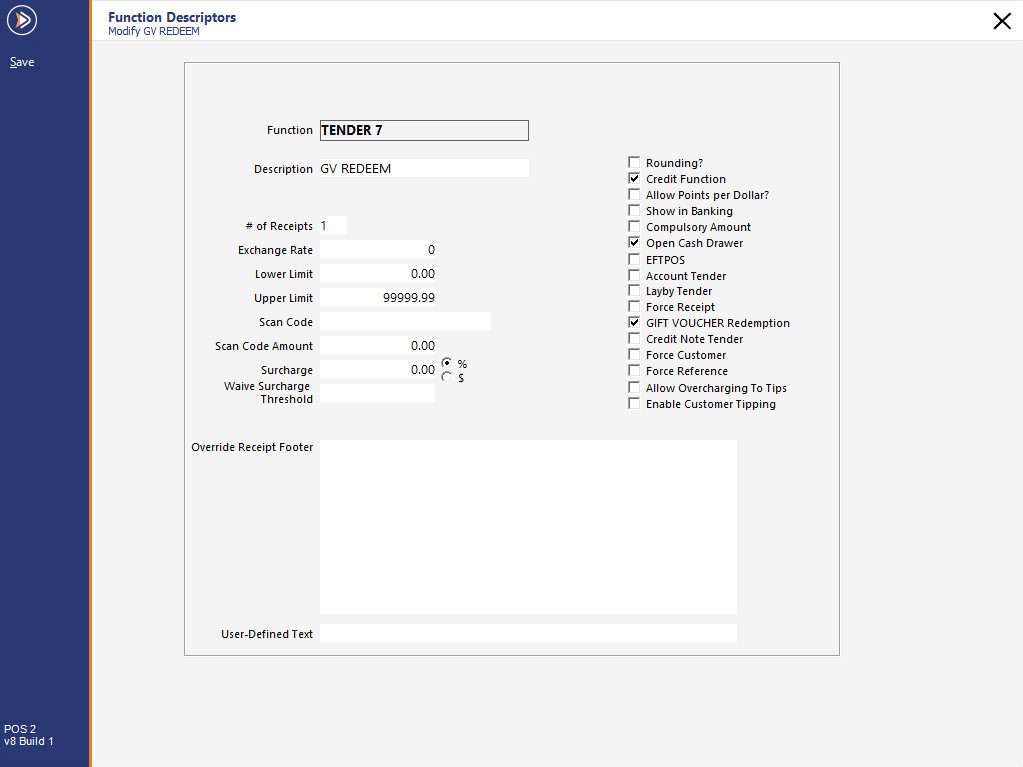
Gift Vouchers are redeemed by selecting the Gift Voucher Tender.
To set the Tender for Gift Voucher Redemptions, go to Setup > Functions > Select a Tender > Modify > Change Description to Gift Voucher > Tick Gift Voucher Redemption > Save.
The next step is to enable the Tender to be used on the selected POS Terminals.
Go to Setup > Yes/No Options > Tenders > Un-tick the option to inhibit the Gift Voucher Tender for the selection of POS Terminals.

You will need to set up a button to sell Gift Vouchers.
Go to Setup > POS Screen > POS Screen Layouts > Select the Layout to program > Buttons > Select a blank button > Select the Function Type as “Received on Account” > Select Gift Voucher from the drop down menu > Select a Gift Voucher Type (if you want to only sell this type of Gift Voucher with this button) > Save.
Note that once a Gift Voucher Type has been set for a button, it cannot be cleared.
Therefore, if you want to clear the Gift Voucher Type on an existing Gift Voucher button, you will need to remove the Gift Voucher button and create a new Gift Voucher button without a Gift Voucher Type.

Once you start selling Gift Vouchers you may need to do Enquiries on them.
Go to Setup > POS Screen > POS Screen Layouts > Select the Layout to program > Buttons > Select a blank button > Select the Function Type as “Gift Voucher Enquiry” > Save.

When you change the description of the Gift Voucher, it will be recognised throughout different areas of the program automatically.
Go to Setup > Functions > Gift Voucher > Modify > Description > Save.
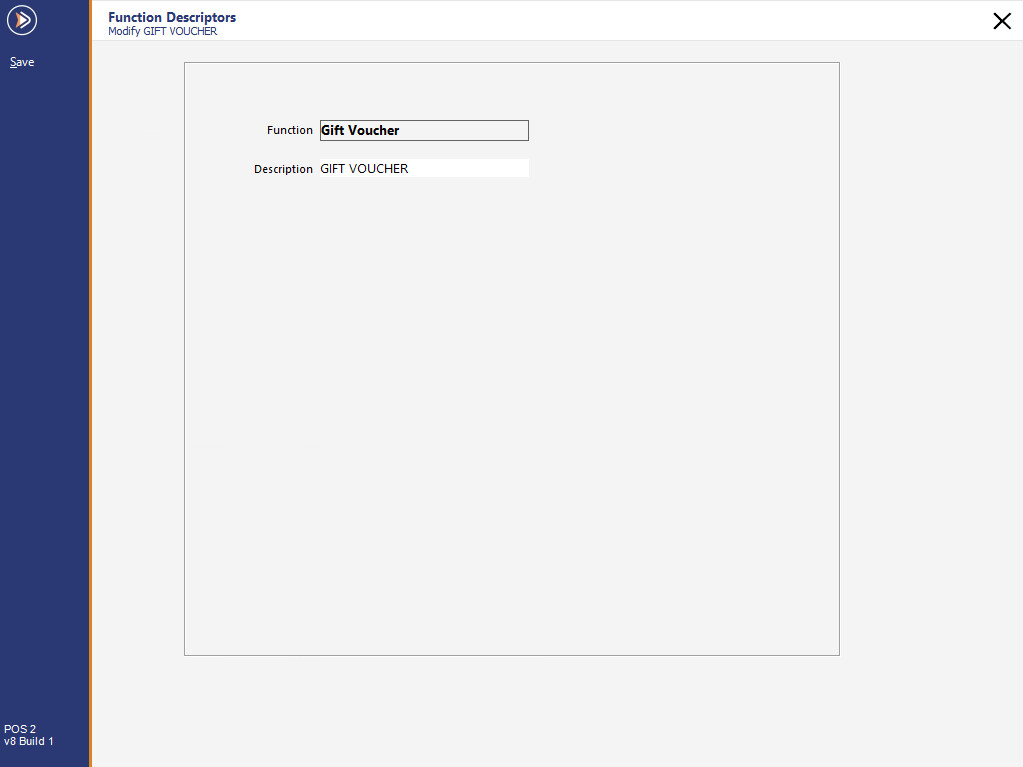
This will now be reflected in various locations throughout the program, for example:
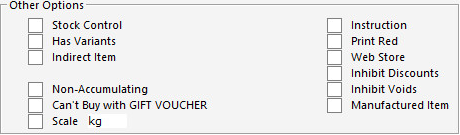
By default, any Stock Item can be purchased using a Gift Voucher.
To prevent customers from purchasing a Stock Item using a Gift Voucher, you can enable the "Can't Buy with GIFT VOUCHER" setting on the Stock Item.
Go to: File > Stock Control > Stock Items > Select the Stock Item > Modify > Enable/Disable "Can't Buy with GIFT VOUCHER" as required.
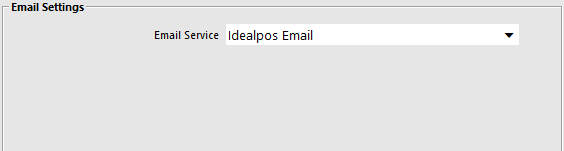
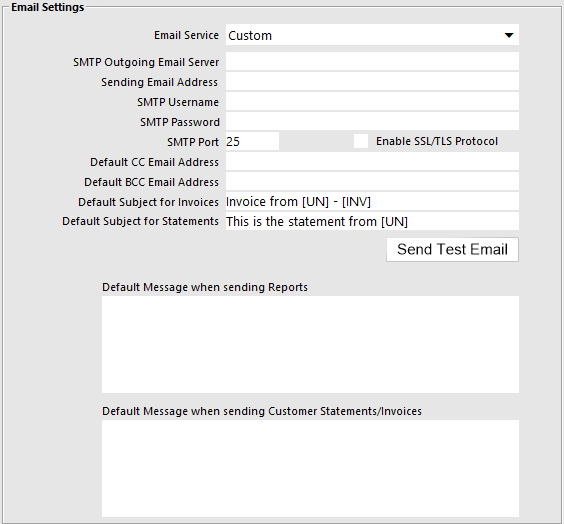
You need configure email settings before you will be able to send an email.
Go to Setup > Global Options > Other Options > Email Settings.
Each time the Idealpos application sends an email, an "Email" event will be recorded in the Idealpos Activity log in the format of "Email: name@domain.com".
The content (message body) of the email is not stored in the Activity Log.
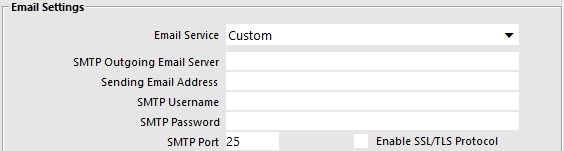
This section enables the selection of either Idealpos Email or Custom.

Note!
The option selected in the dropdown box (Idealpos Email or Custom) will be configured automatically when upgrading from an older build of Idealpos to a build that supports the Idealpos Email option.
E.g. If the Email Settings were previously configured in an older build of Idealpos, upgrading to a new build of Idealpos will use the Custom option and the previously configured settings will be retained.
If the Email Settings were not previously configured in an older build of Idealpos, upgrading to a new build of Idealpos will use the Idealpos Email option.
These fields can contain email addresses that will receive an email copy each time an email is sent from Idealpos.
Setup default subjects that will be sent with every Invoice/Statement from Idealpos to customers via email. You can enter whatever you like in these fields and they will be used, however additional information can also be included.
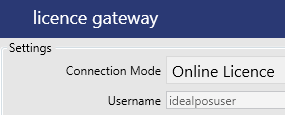
[UN] – User Name from Idealpos 9 Licence Gateway.
[INV] – Invoice/Statement Number for the attached document.
Go to Setup > Global Options > Other Options > Email Settings > Default Subject for Invoices/Statements.

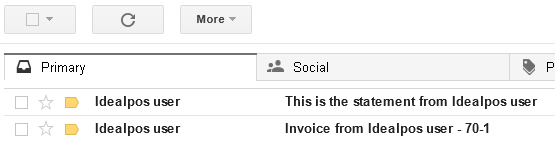
When the email is received by the customer, the details will be added into the subject.
This function allows you to create a default message that will be sent when you send reports. There are two separate messages that you can select.

We are happy to add to this list if you can provide us with all the necessary details to make the email server work.
Gmail
Outgoing = smtp.gmail.com
User = Gmail email address
Password = Gmail Password
Port = 587 (Alternative ports are 465 or 25)
SSL = Ticked
Sending Email Address = Must be a Gmail account.
Note!
You must login to your Gmail account & enable IMAP in the settings before being able to use Gmail.
You must also use the Gmail email as your sending email address.
When setting up POS to use a Gmail account as the SMTP server, take note if the account being used has 2 factor authentication turned on. This will change the way we set details in POS.
When 2 factor authentication is turned on, any application that attempts to log in to the user’s gmail account for the first time will trigger an SMS message to the user’s phone with an authentication code. Apps that support the 2 factor authentication will then ask for this code, while those that don’t will simply fail to authenticate. The way to get applications that DO NOT support 2 factor authentication to work (when it is turned on for the account) is to set application specific passwords in the user’s google account settings.
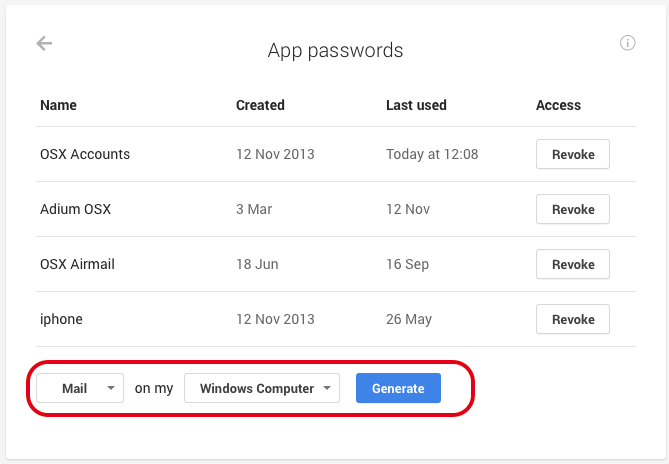
On the user’s gmail page, click the account picture in the top right corner, and click Account. Then, click on the Security tab.
If 2 factor authentication is enabled, it will be visible here.
If it is enable, you will need to click on the “Settings” option next to “App passwords”.
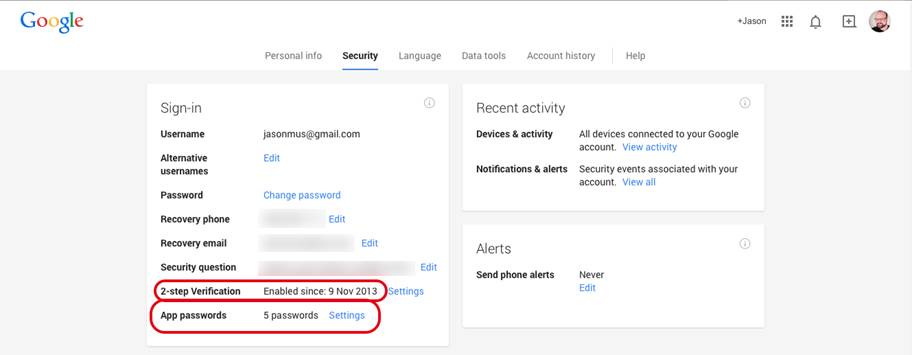
This will list all current application specific passwords. At the bottom, select “Mail” and “Windows Computer”, then “Generate”.
This will generate a password that you can then use in POS to authenticate successfully with the gmail SMTP server.
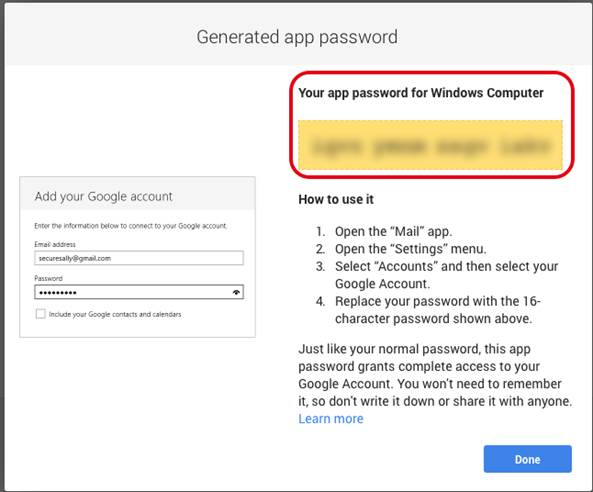
The user must use this password (not their account password) so that POS can authenticate without supporting Google’s 2 factor authentication.
TPG
Outgoing = mail.tpg.com
User = TPG User name
Password = TPG Password
SMTP Port = 25
Live/Hotmail
Outgoing = smtp.live.com
Sending Email Address = Must be a Live/Hotmail account.
User = Live/Hotmail Email Address
Password = Live/Hotmail Password
SMTP Port = 587
SSL = Ticked
Note!
You must also use the live/Hotmail email as your sending email address.
Spark (ex Xtra)
Outgoing = send@xtra.co.nz
Sending Email Address = Must be a Spark account.
User = Spark Username
Password = Spark Password
SMTP Port = 587 (Spark recommend 465 however we could not get this to work)
SSL = Ticked
Note!
You must use the Spark email as the sending email address as this service require authentication.
Telstra BigPond
Outgoing = mail.bigpond.com
Sending E-mail Address = Must be Telstra outgoing e-mail address
SMTP Port = 25
SSL = Unticked
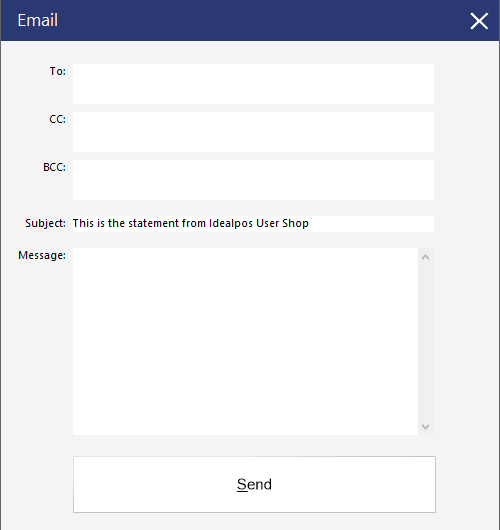
The Send Test Email button can be used after the Email Settings have been entered.
Pressing the button will display a new "Email" window which can be used to test sending an email.
The following fields are displayed - populate the fields as desired and press the "Send" button to test sending an email using the entered settings.
To perform a quick test, simply enter an email address in the To field, and you may want to adjust the Subject line and include a test message in the Message field.
To: Enter the recipient's email address that the test email will be sent to.
CC: Enter any Carbon Copy email addresses that are to receive the test email.
BCC: Enter any Blind Carbon Copy email addresses that are to receive the test email.
Subject: Enter a Subject for this test email. By default, the Subject field will contain "This is a statement from [Store Name]
Message: Enter a message for this test email. By default, the Message field will be blank.
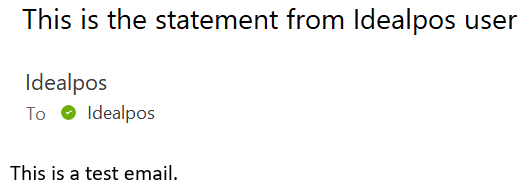
After pressing the "Send" button, a successful message will be displayed if the email was sent successfully.

The recipient will receive a copy of the test email message.
If the test email message failed to send, a failure response will be displayed in the prompt; the Email Settings will need to be reviewed/adjusted and attempt to send another Test Email again after modifying the Email Settings.
If required, the Idealpos Error log file can be referenced for additional details.
The log file is available in the following folder location:
C:\ProgramData\Idealpos Solutions\Idealpos\LOGS\IPSError.log